
Previewing Ember 2.0 on Canary
Wow! This takes me back! Please check the date this post was authored, as it may no longer be relevant in a modern context.
Ember.js 2.0 is right around the corner. Lots of the discussion around 2.0 has focused rather narrowly on specific features, but there has been little reflection (since the RFC) on what 2.0 apps will look like as a whole. I definitely recommend you read Yehuda’s transition blog post though, as it really lays out the nitty gritty.
Meanwhile, Angular 2.0 is entering alpha this summer. You may have noticed several talks on how to write an Angular 2.0 app from scratch. Many of the active members of the Ember community maintain large 1.x applications, and thus we tend to focus less on “from scratch” and more on how to manage the migration forward.
Thinking about apps “from scratch” is still useful for existing users though. It reminds us where the framework is going, and why we invest time in upgrades and learning new APIs. It also helps us be better teachers to new users of the framework at work and in the community.
Ember.js Canary is not Ember 2.0, but it is already a significant departure from what an earlier 1.x app might have looked like. Let’s use it to get a preview of the Ember to come.
Using Ember-CLI with Canary
I’m going to quickly show you how to build an idiomatic app with Ember.js Canary. Canary is the cutting edge of Ember.js, and though it is not the “2.0” release it definitely a close approximation.
Ember-CLI is a fantastic tool, and has revolutionized how Ember applications are developed. Using Ember-CLI is, at this point, required for a modern Ember app. To install Ember-CLI:
- You will need to install Node.js 0.12. I often use a tool called nvm on a new computer.
- You will need to install NPM, the Node Package Manager. This should come with your
Node.js installation. I’ve found that old versions of NPM can be
problematic, and encourage you to make sure you are on a recent release
by running
npm install -g npm. - You should install or update your bower installation:
npm install -g bower.
If you already have these tools, then you’re all set. Just run:
npm install -g ember-cli@0.2.5
Now we can create a new application with the command:
ember new todo-list
To approximate Ember 2.0, we need to install Ember.js Canary and enable a few
feature flags. These are not steps a new developer would usually take, but bear with
me. cd into the application directory, then install Ember.js and Ember-Data Canary:
bower install components/ember#canary components/ember-data#canary --save
# You may be prompted to resolve the version of Ember and/or Ember-Data.
# If so choose the one labelled "canary" and use "!". Usually you type
# "!1" and hit enter.
Feature flags are only available when using Ember Canary builds. Flags enable
certain code-paths in the framework, often at load time. To approximate 2.0,
we want to add these lines to config/environment.js:
// config/environment.js
module.exports = function(environment) {
  var ENV = {
    // ...
    EmberENV: {
      FEATURES: { // Here we enable some experimental features:
        'ember-routing-htmlbars-improved-actions': true,
        'ember-views-component-block-info': true,
        'ember-htmlbars-component-generation': true
      }
    },
    // ...
  };
  return ENV;
};
The full list of available experimental features can be found in the FEATURES.md and features.json file. You can read more about feature flags in the guides.
Lastly, we want to use the new “pods” directory layout for Ember apps. Edit
the .ember-cli file and add the "usePods": true option:
{
  "disableAnalytics": false,
  "usePods": true
}
And with that, we’re ready to start coding. Boot up the Ember-CLI server with the following command:
ember serve
And visit http://localhost:4200. You should see “Welcome to Ember.js” in your browser.
Creating Routes and Links
We’re going to build the most boring app we could write. I’ll guide you through writing a very simple todos application, but if you’ve used Ember a simple app will let you focus on what the idiomatic style is for a new codebase. If you’re new to Ember, there is plenty to learn.
First we need a URL for our items (/items). Easy enough, Ember-CLI will generate the
needed files for us:
ember generate route items
And we want to add a link to /items from the / page. To start, generate an index template:
ember generate template index
Index templates behave much like index.html files on a webserver: They
are the default route (and template) served if you are not visiting a
specific sub-route.
Edit the index template and add a link:
{{! app/index/template.hbs }}
{{link-to 'Items' 'items'}}
If you reload the / URL in the browser, you will see a link to the “Items”.
If you click the link, you will be taken to /items and the link will
disappear. Ember pages are nested inside outlets, and if you open the
app/templates/application.hbs file you will find an outlet helper there.
Changing the URL of an Ember application changes which route is mounted
on an outlet. The index route is the default route for /, and thus is a
sibling of the /items route. If you change the url from /items
back to /, the app/index/template.hbs file will be loaded back into the
outlet. As sibling routes, index and items will share the outlet. Only one
can be rendered at a time.
Install the Ember Inspector (Chrome, Firefox). After installation, open the developer tools (command-option i) and click the “Ember” tab. Under “Routes” you can see the available routes and note that the bold one changes as you navigate.
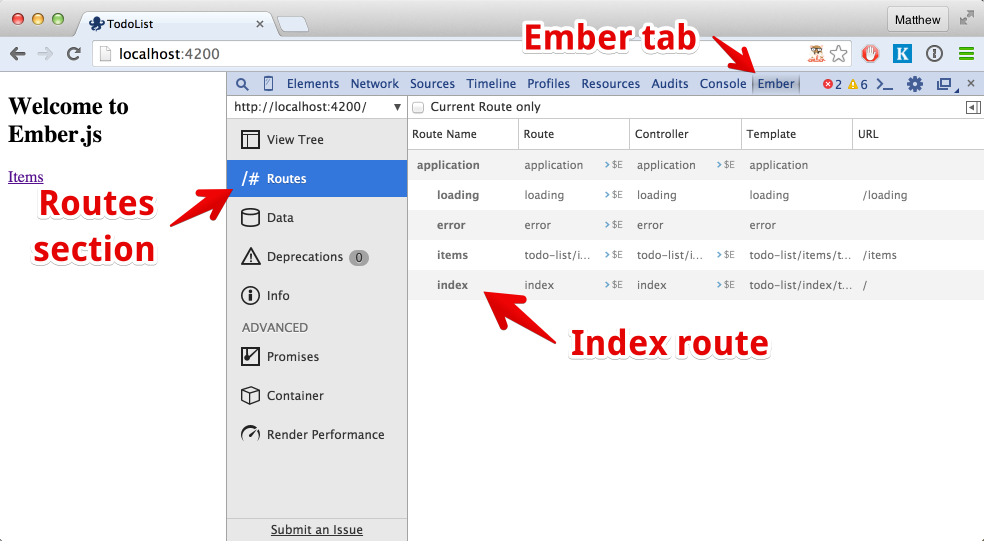
The inspector is a fantastic debugging tool. If you click “$E” near any object, that object
will be send to the console (as $E) where you can investigate its state.
Note: The “View Tree” section in the inspector is likely broken due to updates with Ember’s new Glimmer rendering engine. It should be fixed in the next release.
Using an Ember.js Addon and Defining an Ember-Data Model
To keep our todo list across page refreshes, we will need to store it somewhere. Ember-Data provides ways to save data to a server out of the box, but not to save data to IndexDB (or the alternatives). Thankfully, there is an addon that makes using Mozilla’s localForage library a breeze.
Addons are a little more than simply a library for your Ember application to use. They can add code to the application runtime, but can also add or change the build pipeline itself. For example, the compiler that turns Ember templates into JavaScript objects before sending them to the browser is itself an addon.
The addon we want is the ember-localforage-adapter. Installing it is easy:
ember install ember-localforage-adapter
After installation you must restart the ember serve server.
Next we will need to configure an adapter for the application. Adapters tell Ember-Data how to save model data after serialization (the process of converting a record into a payload for persistence). The “application” adapter is a special default adapter- it applies to any and all models we define.
Create an application adapter and export the localforage adapter:
ember generate adapter application
// app/application/adapter.js
import LFAdapter from 'ember-localforage-adapter/adapters/localforage';

export default LFAdapter;
And next define the model for “item”:
ember generate model item
// app/item/model.js
import DS from 'ember-data';

export default DS.Model.extend({
  task: DS.attr('string'),
  isDone: DS.attr('boolean')
});
At this point, return to the inspector and click the “Data” section. Note that there is a model type of “item” now, although there are no records to be found. Later you can return to this section and see changes to the data.
Using Components and Actions
Most routes in an Ember application can be thought of as having a “subject”. This object represents the focus of the user’s interaction for that route. We call this subject the “model” of that route.
For the items page, our subject is a list of items. Edit the items route to return the items in our Ember-Data store:
// app/items/route.js
import Ember from "ember";

export default Ember.Route.extend({
  model() {
    return this.get('store').find('item');
  }
});
However we need to display the list. Additionally, we will want to input new tasks. To do this edit the items template:
{{! app/items/template.hbs }}
<div>
  <input-task on-enter={{action 'createTask'}} />
</div>
<ul>
  {{#each model as |item|}}
    <li>
      <input type="checkbox" checked={{item.isDone}} {{action 'toggleIsDone' item on="change"}} />
      <span>{{item.task}}</span>
    </li>
  {{/each}}
</ul>
There are three interesting bits to this template:
<input-task on-enter={{action 'createTask'}} />
This code calls an Ember component responsible for where new tasks are entered. When the user hits enter, the action “createTask” will be called. The code calling the action (the input task component) decides what arguments will be passed.
{{#each model as |item|}}
The each helper iterates over an array of entries. In this case, it iterates over the items returned
from the model hook and yields the inner block of with the variable item. In Ember we call item or any other
value between the | characters a block param.
<input checked={{item.isDone}} {{action 'toggleIsDone' item on="change"}} />
There are two curly sections on this this line. First, the property “checked” is bound to whatever item.isDone
is. Second, the {{action helper attaches an event listener for change events on the input tag. For each event triggered,
the toggleIsDone action will be called with the item passed as an argument.
In total, there are two actions used in this template. Lets
write the handlers for these actions: createTask and toggleIsDone.
ember generate controller items
// app/items/controller.js
import Ember from "ember";

export default Ember.Controller.extend({
  actions: {
    createTask(task) {
      const item = this.get('store').createRecord('item', {
        task,
        isDone: false
      });
      item.save();
    },
    toggleIsDone(item) {
      item.toggleProperty('isDone');
      item.save();
    }
  }
});
Next lets implement the input-task component. Ember components
are heavily inspired by the web component standards, but differ where we feel
the specs are lacking. A great example of this is block params (the as |item|
syntax). Nothing like block params exists for web components, but we find them
supremely useful in real-world applications.
To create a component, start with the generator:
ember generate component input-task
We want to create an input tag, and when the user hits enter submit the task. Like most new parts of an Ember app, we should start with the template:
{{! app/components/input-task/template.hbs }}
{{input value=value insert-newline=(action 'submit')}}
The component’s JavaScript must manage the value value, the submit action,
and call the passed in createTask action when appropriate. Here is the
implementation:
// app/components/input-task/component.js
import Ember from "ember";

export default Ember.Component.extend({
  tagName: '', // don't create a tag for this component
  actions: {
    submit(value) { // insert-newline is called with the input's value
      this.attrs['on-enter'](value); // call the on-enter action
      this.set('value', ''); // reset the input value
    }
  }
});
That should be everything wired up. Load up your browser and take a look. Note the changes to the data in the inspector, and that the records persist across page reloads.
Writing an Acceptance Test
The Ember community takes testing pretty seriously. As we’ve been generating different parts of the todo application, we’ve also generated tests. To run these tests with Chrome run this command:
ember test --launch Chrome
There is also a server option, and by default the test runner will try to use PhantomJS
to run the suite without a browser booting. See ember test --help for details on those
options.
The tests generated so far are all unit tests. Ember also supports acceptance tests. These allow you to test an application as driven by the user. To generate an acceptance test run:
ember generate acceptance-test items
And add our test to the generated file:
// tests/acceptance/items-test.js
import Ember from 'ember';
import {
  module,
  test
} from 'qunit';
import startApp from 'todo-list/tests/helpers/start-app';

const ENTER_KEYCODE = 13;
var application;

module('Acceptance: Todos', {
  beforeEach: function() {
    application = startApp();
  },

  afterEach: function() {
    Ember.run(application, 'destroy');
  }
});

test('visits /, navigates to items, adds an item', function(assert) {
  visit('/');
  click('a:contains(Items)');

  andThen(function() {
    assert.equal(currentURL(), '/items', 'url is correct');
  });

  fillIn('input[type=text]', 'New Task');
  keyEvent('input[type=text]', 'keyup', ENTER_KEYCODE);

  andThen(function() {
    const input = find('input[type=text]');
    assert.equal(input.val(), '', 'input has been reset');
    const task = find('span:contains(New Task)');
    assert.equal(task.length, 1, 'task is on the page');
  });
});
Ember’s acceptance test harness provides several “async helpers” such as visit, click
and the form manipulations. The andThen helper allows us to ensure any asynchronous
behavior such as fetching records from a persistence layer or animating the UI are complete
before making assertions.
Where to Go Next
This small app touched a pretty wide expanse of Ember’s API. Some of the features we touched were cutting edge, but most are part of Ember.js 1.12. Here are some further resources on the topics covered:
- Ember-CLI
- Ember Addons
- Ember-CLI w/ pods
- ES6 Modules
- Ember-Data
- Routing
- link-to helper
- Ember Inspector
- Actions
- Components
- Input helper
- Async Test Helpers
- docs
- guide
- Demystifying Ember Async Testing blog post
We’ve also been able to build a pretty neat interaction in under 60 lines of code (+ under 40 in the test), and the result is a codebase no Ember developer should have trouble working with.
There are still a lot of details to work out for Ember 2.0, and you’re bound to hear discussion about those topics in the next few weeks. Even short of landing those details, the ecosystem as a whole is incredibly improved. All these pieces working in harmony speaks to the diligence and continued effort from the community.
Whether you use Ember already or are looking at it for the first time, I hope this gave you some fresh perspective. Getting started with the framework has never been easier.