Building a Progressive Web App with Ember
Wow! This takes me back! Please check the date this post was authored, as it may no longer be relevant in a modern context.
Google’s Progressive Web Apps, or “PWA”, initiative specifies a set of requirements for modern web apps. In this post, we will take a new Ember app and transform it into a deployed PWA using service workers, server-side rendering via Fastboot, a web app manifest.
The checklist for being PWA compliant is pretty extensive. The general idea, however, is to build apps that are:
- Reasonably secure and private (HTTPS).
- Responsive to screen sizes and device capability.
- Provide a basic offline experience.
- Have acceptable performance, even on low-end networks and devices.
When a developer follows these guidelines they are rewarded with an application that performs well regardless of network availability or device quality, is a candidate for web app install banners, and generally has a quality user experience.
www.shop-201.com is a progressive web app built using Ember by the team at 201 Created. It can be installed on your Android home screen, works offline, and when you are online supports credit card and Apple Pay checkouts.
To support developers building progressive web apps, Google has provided Lighthouse. Lighthouse is a Chrome extension that analyzes a website for PWA compliance. Lighthouse can’t validate all parts of PWA compliance, but it’s the best check we’ve got.
When you run Lighthouse, it provides a score between 0 and 100 for several buckets: Progressive Web App, Performance, Accessibility, and Best Practices.
Let’s see how to land a perfect 100 score in the Progressive Web App category while starting from scratch with Ember. We did this in the process of building www.shop-201.com, and the result is pretty great.
Getting Started with Lighthouse and Ember
To get started, you’ll need Node.js and Chrome. The Installing Ember guide is a good resource for setting up Node and the other pre-requisites for Ember.
First, install Lighthouse. After doing this an icon will appear in Chrome’s toolbar.
![]()
Click this to generate a Lighthouse report for any webpage. I’ll link to several pages you can generate a report for, but try it on you own work as well.
- www.shop-201.com
- shop.polymer-project.org
- code.nasa.gov
- www.progressivewebflap.com
- More at hemanth/awesome-pwa and pwa.rocks.
The score for www.shop-201.com looks like this (at time of writing):
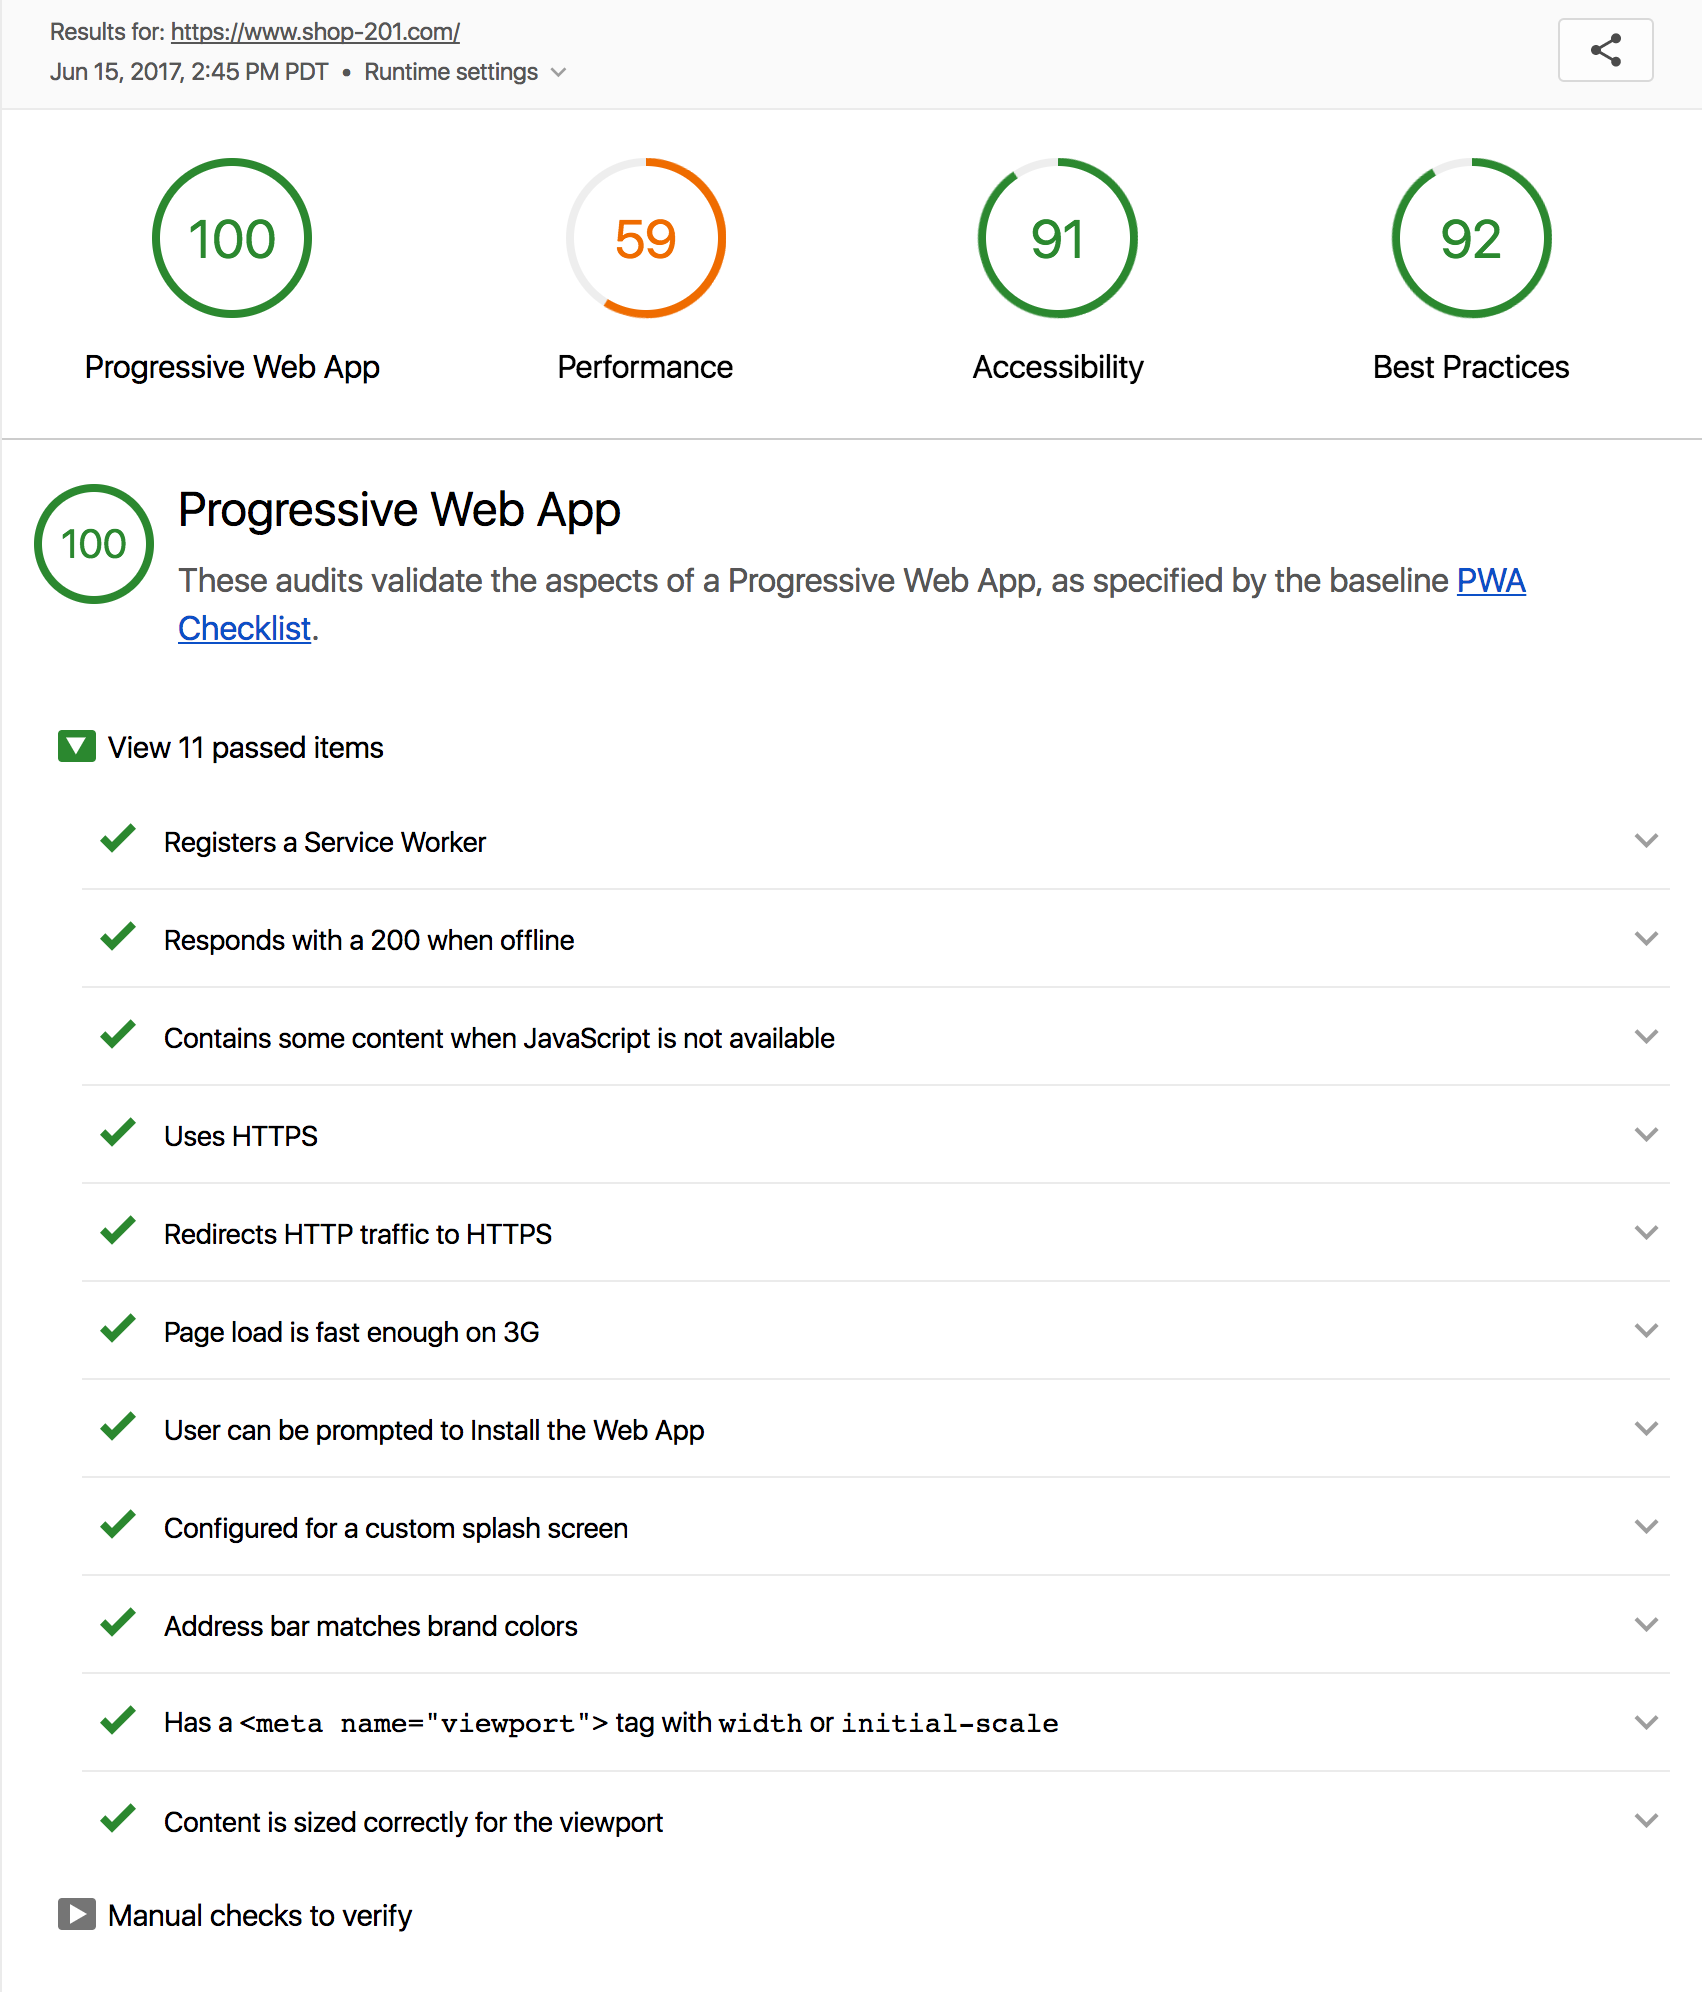
Let’s generate a new Ember application and check the score there. Install the latest version of Ember with:
npm install -g ember-cli
Then create a new application with:
ember new my-pwa
Boot the application’s development server:
cd my-pwa/
ember serve
Then visit http://localhost:4200 to see the Ember welcome page. Go ahead and run Lighthouse on it. You will get something like the following:
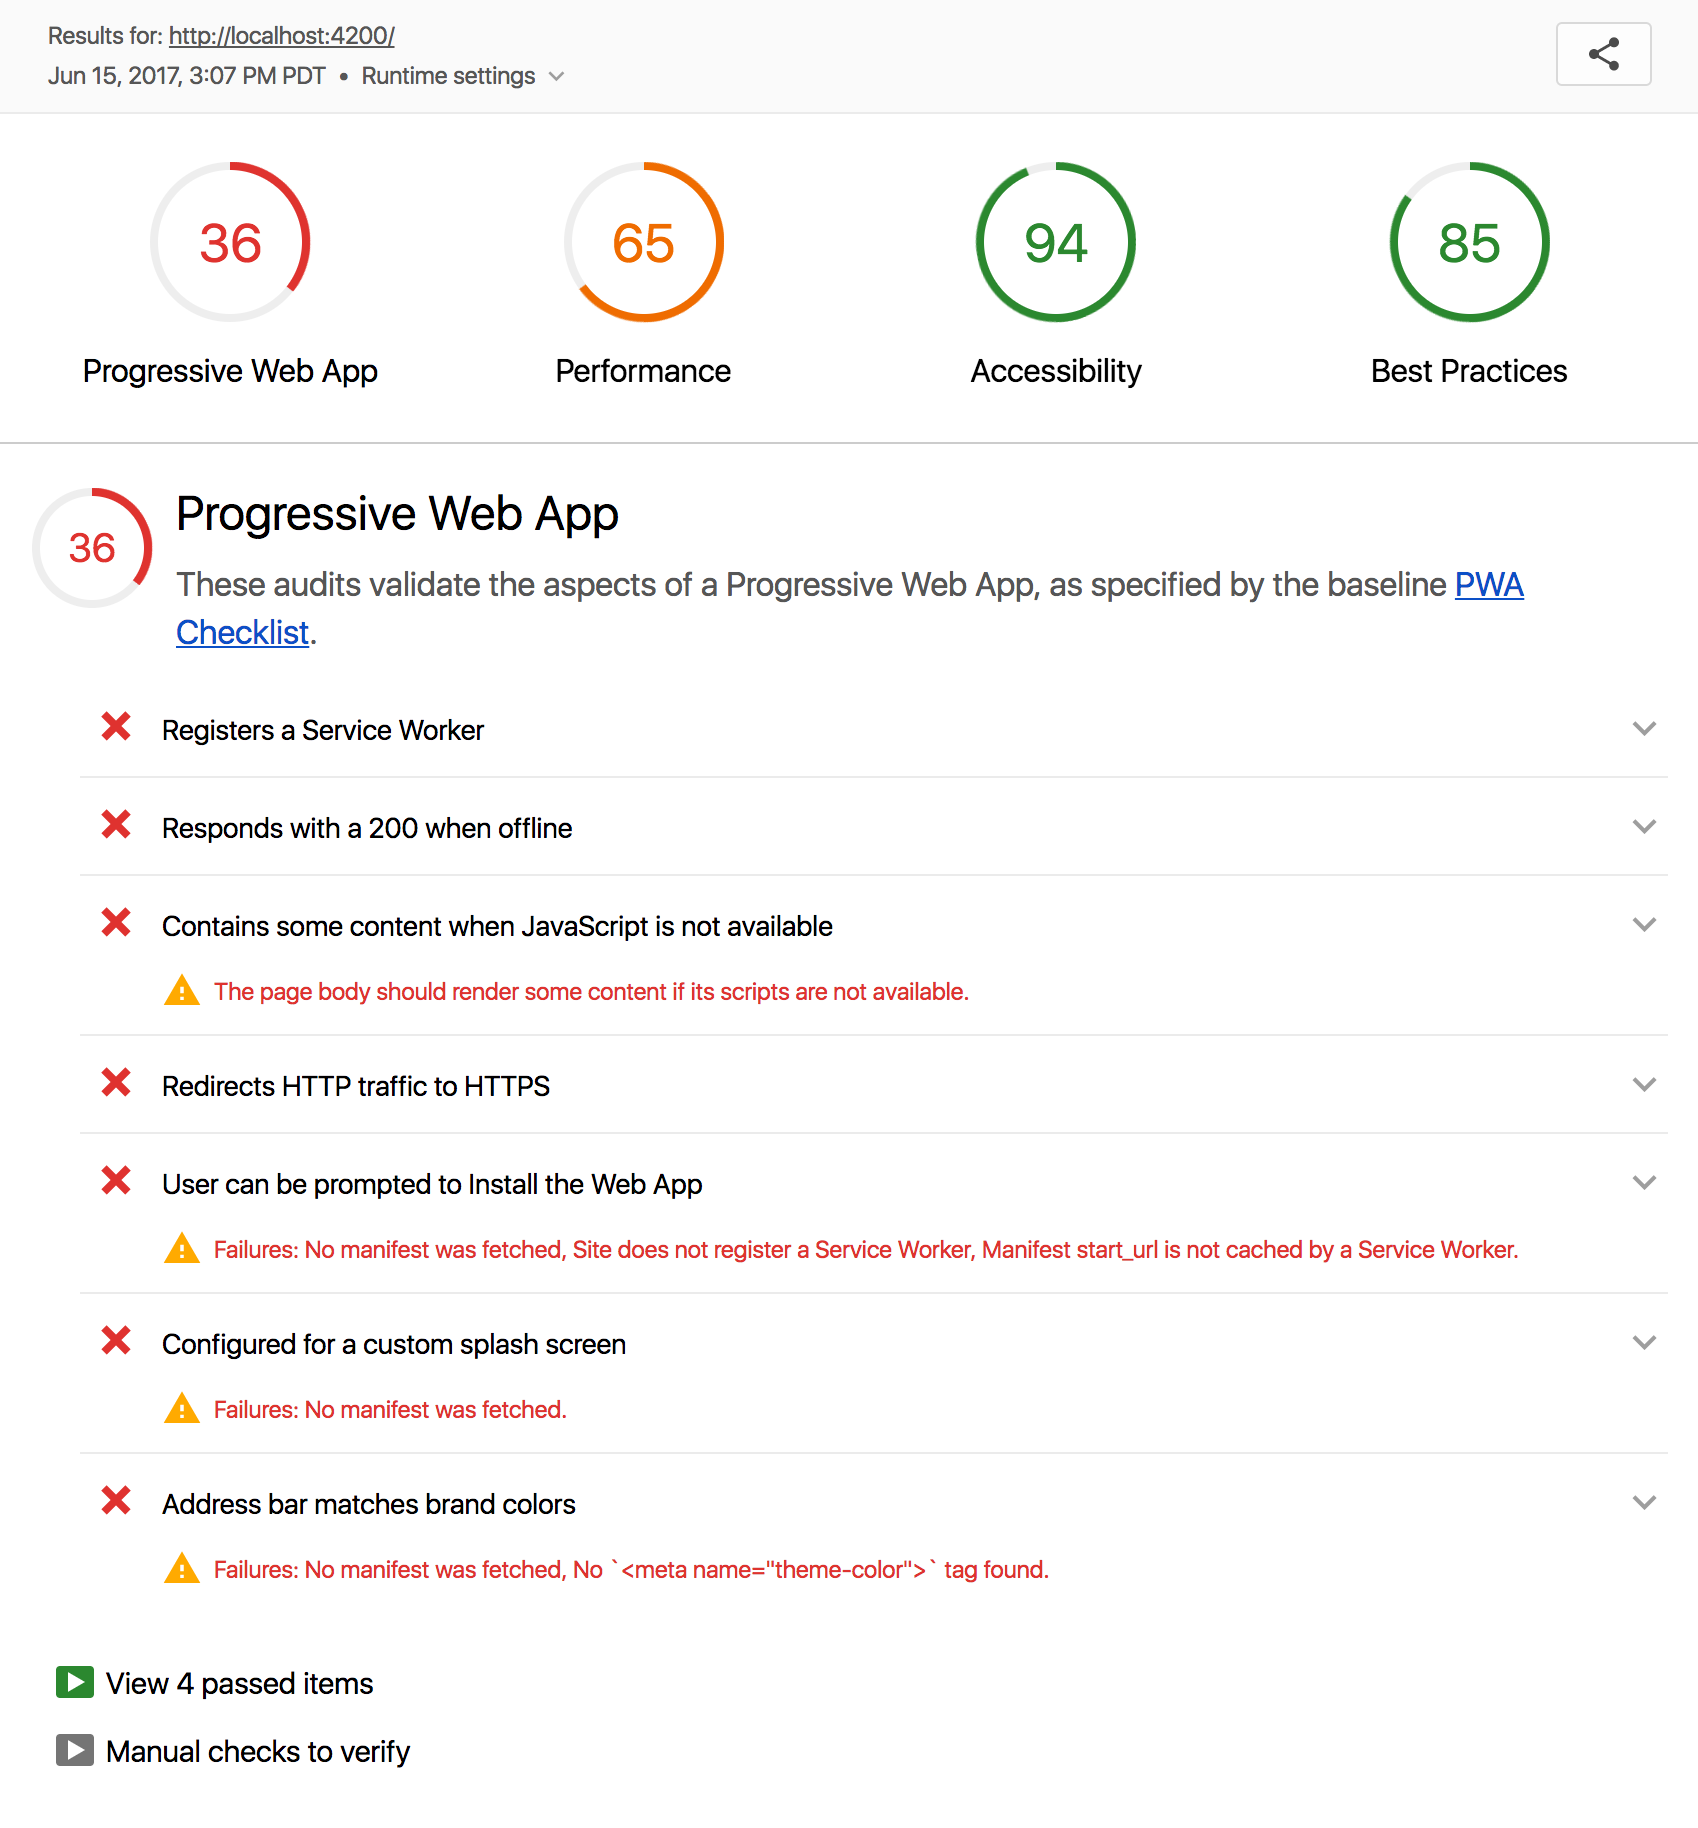
A bloodbath of red! We will need to address seven defects to make this basic app hit 100. Lighthouse requires that the app:
- Registers a Service Worker.
- Responds with a 200 when offline.
- Contains some content when JavaScript not available.
- Redirects HTTP traffic to HTTPS.
- User can be prompted to Install the Web App.
- Configured for a custom splash screen.
- Address bar matches brand colors.
Lets get to it.
Adding a ServiceWorker to an Ember app
The ServiceWorker API allow developers to intercept calls to the network initiated by their own JavaScript code or by the browser. For example, after a service worker is loaded it will be called for each CSS file linked to on an app’s domain. Service workers even run when an browser is not connected to the Internet. This makes them a great way to support offline websites.
Ember-CLI addons modify the standard Ember build pipeline. Sometimes they do something as simple as add runtime code to an application, but they can also output additional files (like those required to publish a service worker).
Let’s use these three addons to bring service worker support to the app:
- ember-service-worker provides baseline support for service workers. This addon provides a pluggable API for you to implement logic for service workers (or use logic others wrote and published as addons).
- ember-service-worker-asset-cache will cache css, image and JavaScript assets for the app.
- ember-service-worker-cache-fallback provides offline support for a given path.
Install these addons with the following command:
ember install ember-service-worker ember-service-worker-asset-cache ember-service-worker-cache-fallback
For our use-cases, these addons need to be configured in two ways:
- You’ve noticed the friendly tomster displayed by our app. By default, the asset cache
addon will cache all paths at
assets/**/*, however that image lives atember-welcome-page/images/construction.pngwithout anyassets/prefix. We need to add that path to the list of cached paths. - The cache fallback addon must be configured to store the last “
/” path fetched over the network and serve it from cache when the network is unavailable. This is what will let our app boot up even when offline.
Open ember-cli-build.js and add the 'asset-cache' and 'esw-cache-fallback' sections below:
/* eslint-env node */
const EmberApp = require('ember-cli/lib/broccoli/ember-app');

module.exports = function(defaults) {
  var app = new EmberApp(defaults, {
    'asset-cache': {
      include: [
        'assets/**/*',
        'ember-welcome-page/images/*'
      ]
    },
    'esw-cache-fallback': {
      patterns: [ '/' ],
      version: '1' // Changing the version will bust the cache
    }
  });

  return app.toTree();
};
Don’t forget that after installing addons or changing ember-cli-build.js, you
must restart your Ember-CLI server.
You can test the offline behavior by using the offline toggle under the network tab in Chrome’s devtools.
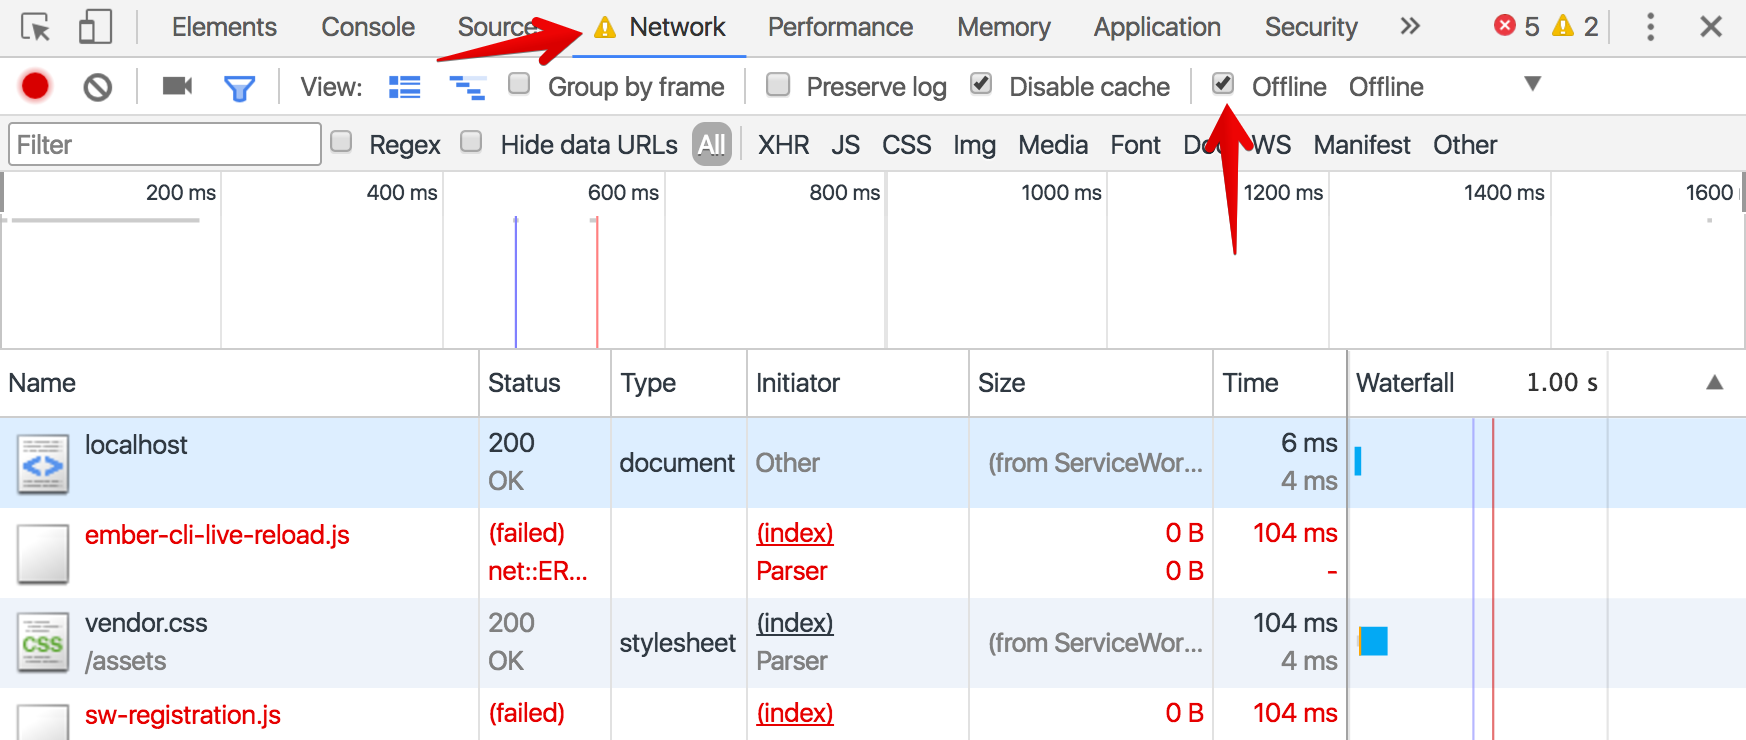
And you can confirm we’ve made a step forward by running Lighthouse again. Adding a service worker with caching rules knocks off two items on our list. Five to go!
Registers a Service Worker.Responds with a 200 when offline.- Contains some content when JavaScript not available.
- Redirects HTTP traffic to HTTPS.
- User can be prompted to Install the Web App.
- Configured for a custom splash screen.
- Address bar matches brand colors.
Server-side Rendering with Ember Fastboot
To deliver a good experience to all users, progressive web apps are intended to degrade gracefully. If the user doesn’t have JavaScript enabled, we must show them something.
Try running your Ember app without JavaScript. Access the devtools menu:

And toggle the “Disable JavaScript” button:
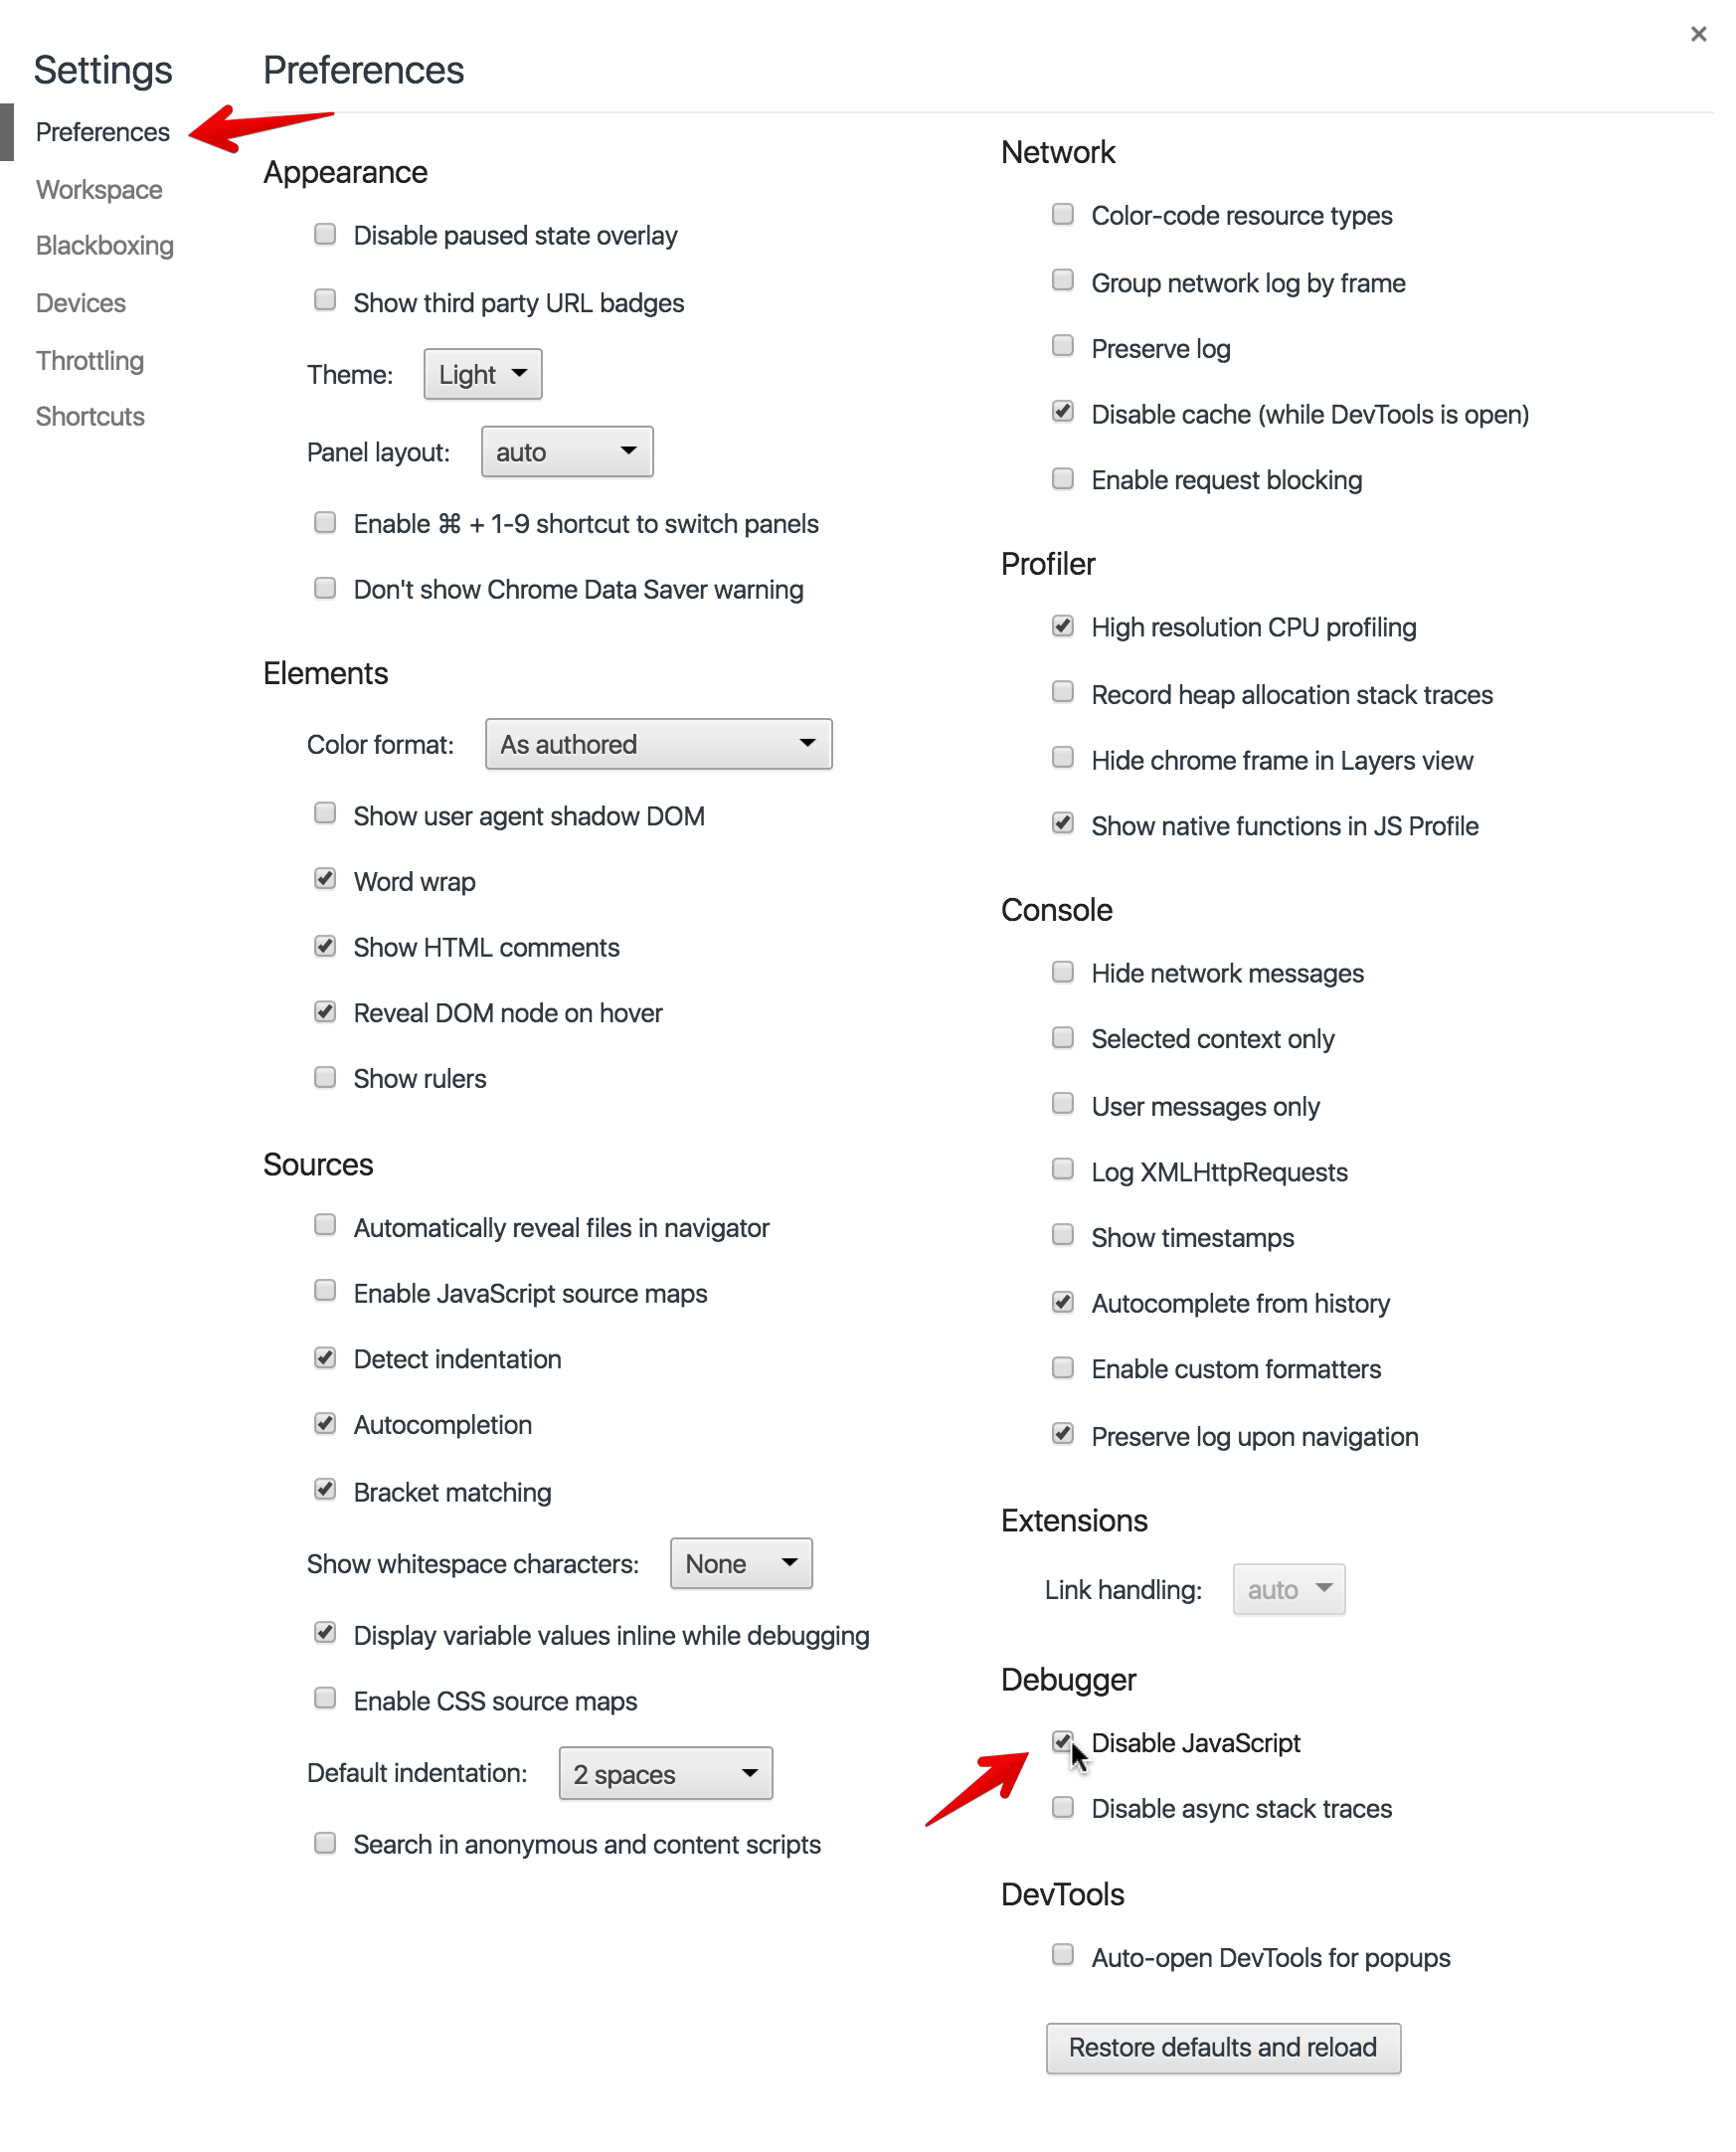
Reload the Ember app. You’ll see nothing but a blank page.
To satisfy Lighthouse, all we need here is some “splash of style”. Even a
message notifying users they must enable JavaScript would be sufficient.
Editing app/index.html in our Ember app would allow us to add a message like this,
and for
some apps that would be the right approach.
But for many apps there is meaningful content that could be displayed. Ember provides a solution for running apps on the server with Node.js, and returning the resulting page as HTML. We call this “server-side” rendering (or SSR), and Ember packages its version of SSR as Fastboot.
Lets add Fastboot to the app. Install Fastboot with this command:
ember install ember-cli-fastboot
Reboot the server and reload the page. Even with JavaScript disabled, you should see the tomster logo being displayed. If you visit view-source:localhost:4200 and you can see the server-rendered content as raw HTML.
Because we’ve already configured the service worker to cache “/” when offline,
offline users will get that same HTML as their initial page. They won’t need to wait for
Ember’s JavaScript to evaluate to see a splash of UI, in this case all of the UI. This improves
the performance numbers of our application in Lighthouse.
With support for browsers lacking JavaScript, we’ve ticked off another requirement. Four items to go!
Registers a Service Worker.Responds with a 200 when offline.Contains some content when JavaScript not available.- Redirects HTTP traffic to HTTPS.
- User can be prompted to Install the Web App.
- Configured for a custom splash screen.
- Address bar matches brand colors.
Creating a Manifest
A major benefit of progressive web apps is the ability to install them. In Chrome and Safari, a user can manually add an app to their homescreen. Chrome users will even be prompted to install homescreen icons for pages they visit often.
The user interface of an installed PWA is described by that application’s web app manifest. A manifest can change what the logo of an installed application is on a user’s desktop, the appearance or presence of the browser’s location bar, and provide other metadata such as what URL to boot.
Writing a manifest by hand is reasonable, but using the ember-web-app addon will get us going more quickly. Install the ember-web-app addon with this command:
ember install ember-web-app
Don’t forget to restart your server after installing this addon.
Lighthouse prefers that our manifest contain icon images at 192x192 pixels and
512x512 pixels. As long as we have an icon larger than 512x512, it will give
our app a passing score. In a real app, we would resize images and commit them to
public/ in the application codebase.
For this blog post, I’ll just re-use the tomster construction
icon. Edit config/manifest.js and add the icon:
/* eslint-env node */
'use strict';

module.exports = function(/* environment, appConfig */) {
  // See https://github.com/san650/ember-web-app#documentation for a list of
  // supported properties

  return {
    name: "my-pwa",
    short_name: "my-pwa",
    description: "",
    start_url: "/",
    display: "standalone",
    background_color: "#fff",
    theme_color: "#fff",
    icons: [
      {
        src: "/ember-welcome-page/images/construction.png",
        sizes: "540x540",
        type: "image/png"
      }
    ]
  };
}
Run lighthouse on the app again. You’ll notice we addressed three more requirements with the addition of a manifest.
Three down, and one to go!
Registers a Service Worker.Responds with a 200 when offline.Contains some content when JavaScript not available.- Redirects HTTP traffic to HTTPS.
User can be prompted to Install the Web App.Configured for a custom splash screen.Address bar matches brand colors.
Deploying an Ember app to Heroku
At this point, we’ve basically got our progressive web app up and running. Indeed when I run the Lighthouse benchmarks on this app each bucket is green across the board:
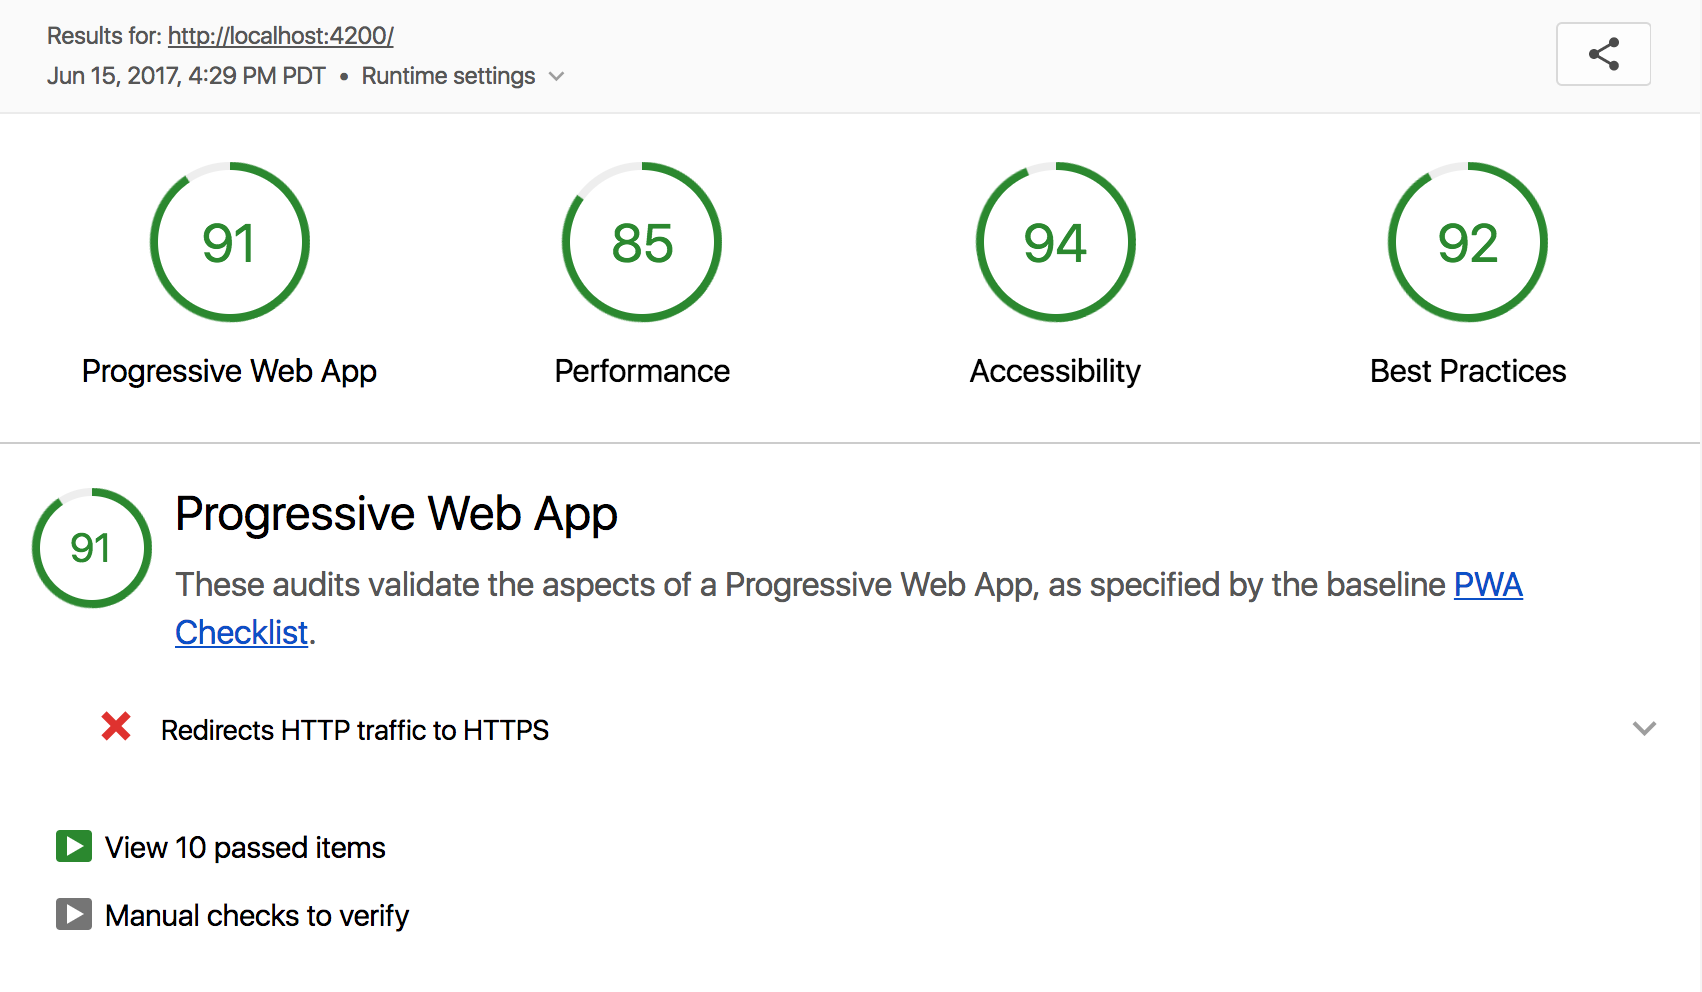
However we’re still short of a 100 for the Progressive Web App bucket. What remains is that our application is expected to redirect from HTTP to HTTPS.
Its worth noting that Chrome has been a little friendly for us this whole time. Service workers are not actually permitted over HTTP, however there is an exception for localhost.
Redirecting to HTTPS is a tricky to do locally, as we would need to run our server as a super-user to have access to port 80. In addition this requirement really isn’t a development need.
Instead, this is a requirement for a deployed app. Lets deploy this thing.
Our last step will be to deploy our Progressive Web App to Heroku. I’m choosing Heroku for this exercise since it is easy, free to deploy to, and includes free SSL setup on its shared domain. If you don’t prefer Heroku, Ember with Fastboot can run on any host that supports Node.js (for example AWS lambda).
To get our app production ready we should keep the following in mind:
- Until now we’ve been using the ember-welcome-page addon (installed by default) to provide our app’s content. This addon will strip itself from production builds. You can either provide your own content for this last step, or I’ll show you how to disable the stripping.
- The
embercommand (Ember-CLI) builds Ember applications, but it doesn’t host them in production. Most of the time, production Ember apps are hosted on static asset hosting services. Apps that run Fastboot usually use the fastboot-app-server with Node.js. - We’re going to deploy this app using Heroku. You will want to install the Heroku CLI and sign up for an account if you have not already.
Before making any changes to address these issues, boot a production build of your application using the following command:
ember serve -e production
Visit the “/” page. You’ll notice it’s completely blank. This is because the
{{welcome-page}} component in the app/templates/application.hbs file is
stripped in production. The authors of this addon figure you will pretty much never want to deploy the
welcome page, so they just make it go away.
Feel free to add your own content at this point, but if not you can continue
the exercise by forcing the {{welcome-page}} component to be present in production builds.
Edit ember-cli-build.js and add the 'ember-welcome-page' section:
/* eslint-env node */
const EmberApp = require('ember-cli/lib/broccoli/ember-app');

module.exports = function(defaults) {
  var app = new EmberApp(defaults, {
    /* ...etc... */
    'ember-welcome-page': {
      enabled: true
    }
  });

  return app.toTree();
};
Restart the production build server, and you’ll see the welcome page is back to being rendered.
Now that our app is being built for production, we need to set up a script to run Fastboot on the server.
Install the fastboot-app-server addon. Note that unlike the other addons
we installed, this one is installed with npm and saved as a hard,
non-development dependency. We will need this dependency installed in
production.
npm install --save fastboot-app-server
Our server is also going to require some customization. The PWA requirement is that the application redirects from HTTP to HTTPS. Some hosting providers might offer a setting for this, but Heroku doesn’t.
Instead, we must
configure the Node express server that hosts the Ember Fastboot app to
manage the redirect. Create a file named serve.js at the root of the
project. Add:
// serve.js
const FastBootAppServer = require('fastboot-app-server');

let server = new FastBootAppServer({
  distPath: 'dist',
  gzip: true, // Optional - Enables gzip compression.
  beforeMiddleware(app) {
    app.use((request, response, next) => {
      if (request.headers['x-forwarded-proto'] === 'https') {
        return next();
      } else {
        return response.redirect(301, `https://${request.hostname}${request.url}`);
      }
    });
  }
});

server.start();
We could run this server locally by calling node serve.js, but it wouldn’t
do much besides redirect the browser to https://.
To run the Fastboot server script, lets deploy the app to Heroku. Configure the app so
it will run on Node 6.x. Open package.json and look for the "engines" key
and change it to the following:
  "engines": {
    "node": "6.x.x"
  },
And create a Procfile to tell Heroku how to boot the server:
echo "web: node serve.js" > Procfile
Then be sure to commit all your changes to Git. After getting Heroku-CLI installed, you can run the Heroku Ember buildpack set up steps:
heroku create
heroku buildpacks:set https://codon-buildpacks.s3.amazonaws.com/buildpacks/heroku/emberjs.tgz
git push heroku master
heroku open
heroku open will open your app in a browser. Take that URL and run Lighthouse
against it. My run looks like this:

Thats it! We’ve hit a score of 100 on Lighthouse’s Progressive Web App bucket, starting from scratch with Ember.js.
Registers a Service Worker.Responds with a 200 when offline.Contains some content when JavaScript not available.Redirects HTTP traffic to HTTPS.User can be prompted to Install the Web App.Configured for a custom splash screen.Address bar matches brand colors.
Wrapping up
The Ember project puts a high value on out-of-the-box productivity. I love the idea that even new Ember developers can go from zero to a phone installable, offline friendly, globally distributed application in about 30 minutes. They can stop worrying about how to be technically compliant with a recommendation like progressive web apps, and focus on the part of their project that makes it unique.
I’ve published a repo with a series of commits reflecting the steps in this blog post: 201-created/my-pwa. Additionally, while it lasts, that repo is published on Heroku at mighty-shore-80848.herokuapp.com.
Thanks to Robert Jackson and Krati Ahuja for landing last-minute patches that made the process of building a PWA with Ember smoother. Thanks to all the addon authors for their amazing work!
Like this post on PWAs and ready to get these features in your own codebase? 201 Created has worked on dozens of apps with Fortune 50 companies and Y-combinator startups. Visit www.201-created.com or email hello@201-created.com to talk with us.
